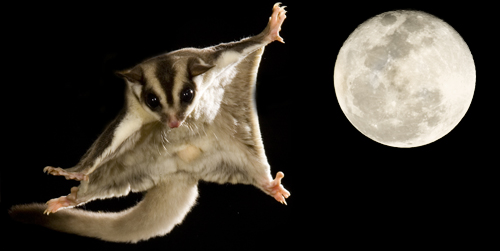
Sugar gliders resemble flying squirrels, but unlike flying squirrels (which do not actually fly) sugar gliders are more aptly named, as they actually glide or voplane by extending the loose, flap-like skin between their fore- and hindlegs. Their furry, flat tail acts like a rudder. Gliders are wonderful examples of parallel evolution, as a sugar glider is a marsupial and a flying squirrel is a placental rodent, yet they eat much the same foods, are both nocturnal, and look incredibly similar.
To shoot this image I had to work in studio, as sugar gliders are native to Australia and New Guinea and the islands in that vicinity. A friend of mine loaned me his, and for over a year I've had very, very limited opportunities to work the squirrels. In my studio I set up a special glider-aviary that measured 10' by 20', giving the chipmunk size animals plenty of space, especially to glide to my baits, and also giving me plenty of space to set up my lights and beams.
Last year, I tried shooting the gliders on film, and for six rolls of effort, shot with a Canon EOS 1n RS, I got ONE usable image. Because I was shooting film, I wouldn't know immediately whether or not I had actually captured a shot, and wouldn't know until I got the film back. I used the RS camera because the shutter lag, when tripped by an electronic remote, is only 8 miliseconds, about 1/180th of a second, so when a glider broke the beam the camera fired almost immediately. In that way, I didn't have to anticipate how far it would glide between the time it tripped a beam and the camera fired -- a lag time that can be considerable, and that can result in out-of-focus images. Well, while it was great to have no lag time, the gliders were climbing on my beams and breaking them, triggering the camera, or jumping so high that, although they broke the beams, they were out of the frame when they did so. Our travel schedule aborted further work after I obtained one usable image and it was only last week, with only one week of shooting time available before our travel schedule again made this project impossible, that I had a chance to attempt the shoot again.
It took an entire day -- one I didn't feel I could afford to waste -- to set up the studio from scratch. This time, to insure that the gliders would only trip the beams at one precise spot I chose to use two beams in an X or cross beam pattern, so that the gliders had to pass through both beams virtually simultaneously to trip the camera. If a glider broke one beam the camera wouldn't fire. Only if the glider broke both beams would the system be tripped, which should somewhat insure that the subject was in the right place when it did so.
I used a digital camera this time rather than a film camera because I simply couldn't afford failure with only one week left to complete the project. My digital cameras have about a 50 ms lag time -- about 1/20th of a second, so a glider will move some distance, X, between the time it trips the beam and the camera actually fires. I, therefor, had to focus at X so that the glider would be sharply in focus. I could achieve this focus by trial and error, analyzing shots to see if the glider would be in focus, but this would be frustrating -- as a great image might be out of focus while I did this experiment. To avoid that, I swung a yardstick through the beams at a speed I felt mimicked that of a jumping glider, and I focused at the spot when my flashes fired. This worked, and I prefocused at that spot.
After I had everything set up, I was almost certain that I could risk using film and focusing on the spot where the beams crossed. Fortunately I didn't succumb, because on my first attempt I had 20 exposures, but only 1 shot of the glider. Apparently the animal climbed up on one of my beams and moved it, which triggered the system incorrectly. Had I shot film, I wouldn't have known this, and would not have made the proper corrections.
In 5 days of shooting I only made about 15 usable shots, but they worked well. For equipment I used FOTRONIX flash heads, which, unfortunately, are no longer commmercially available. I also used the PHOTOTRAPPER (www.phototrap.com) Pro-Remote Beam Controller, where I used 2 laser beams to check for crossing -- with the beams I had the transmitter and receiver as much as 12 feet apart, yet I could aim both beams so precisely that both aligned within one-half inch of each other at the point of crossing.
I have used other remote sensors, and done so satisfactorily, but the great thing about the Phototrapper, especially in this context, was that I could visually determine where the beams were crossing. With infrared sensors, this is much more difficult and trial and error, and virtually impossible to do when you're working alone and where extremely minor adjustments are going to make major differences. With a sensor/transmitter 12 feet away even a minute movement is going to change the angle off, and would make aligning extremely difficult.
I used a 1D Mark II, and I did two important things to keep the camera operating all night. One, I used the AC battery insert, and had the camera plugged into an outlet, and I also turned off the function where the camera automatically shuts down after a given period of time. Turning that to 'off,' the camera stayed 'alert' or 'armed' so that when something tripped the beam the camera was already 'awake' and responded. For that tip I must thank Irish photographer Mike Brown, who was also working with digital cameras and the Phototrapper. Thanks, Mike.
Last, about 12 Bogen Magic Arms or Articulating Arms were used to secure the laser sensors -- I double and triple-braced some so that they wouldn't shift position if a glider crawled over them, 3 Bogan AutoPoles for mounting the flashes, and a studio floorspace of 10x20. About a day and one half was involved in getting everything set up, and almost another day in making the 10x20 foot room glider-escape-proof. Couple that with the day or so involved in setting up my first, unsuccessful attempts, with film, and the time spent maintaining sugar gliders (daily feedings, maintenance, etc., and there's a lot that went into this project.
Last, for this image, I went into my image file and grabbed a full moon for a creative composite. My moon was yellowish, so I used the Channel Mixer and converted the moon to black and white, then masked this, and pulled back some of the original color -- but only slightly. Using the Transform tool I scaled the moon to the right size, and with the move tool I positioned it. All of these 'tricks' you can learn in any of our Photoshop Courses.
However, hopefully you'll agree, the time was worth the images!
|
|
|
|
Flash-Remotes |
|
NANPA |