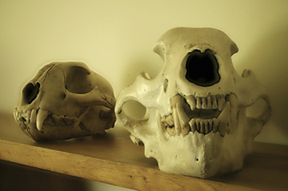
This image was shot at f2.8!

I'm not a software geek and I rarely have time to get on the web, surf sites, and discover exciting new innovations. I owe knowing about this one to George Lepp, who told me about the filter while I sought his advice on a new monitor. George generously shared this fantastic tip ... THANKS, GEORGE!
The above image, and the images shown below were all taken less than an hour ago, right after I downloaded the Helicon Focus filter. The Filter is designed to increase depth of field for macro photography, microscopic photography, and hyperfocal distance landscape photography. It succeeds incredibly well. I rarely get excited about software, if for no other reason than I simply don't have the time to learn something new. This software looked pretty easy to implement, however, which is a huge plus ... and indeed, it was so simple I ran the filter without reading anything other than the menu! And, it worked!

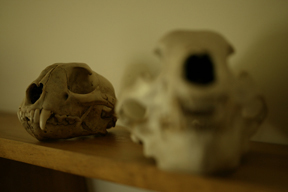
All of the images in the series were shot at f2.8 with a 100mm macro lens. At 2.8, at the working distance I was at, my depth of field was little more than my plane of focus. You can see the shallowness of the depth of field in the two images, showing the start and the finish of the series. The trick is to shoot a series of images, keeping the camera's position constant while very minutely adjusting the focus. In the images of our eclectic library shelf below, my first attempt wasn't too satisfying because I left too many large focusing gaps between images. So, after running the filter, I redid the shots, and shot a whole series where the focus changed by very, very small amounts. In total, there were 38 images, and all were shot at f2.8!


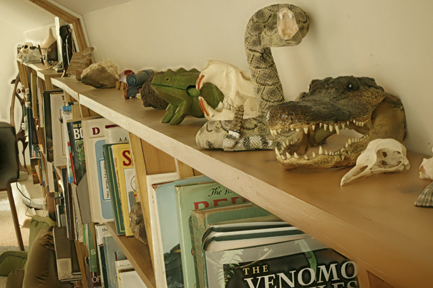
Running the Helicon Focus filter was incredibly easy. In the File Menu's drop down menu I selected 'Add new items), then navigated through my file folders to the images I just shot. In the Open window I selected the images (click and shift-click) and clicked 'open.' A preview window shows an image if an individual image is selected. I always bracket my composite images by snapping off a frame of my hand at the beginning, and at the end, of the sequence so that I have a dark or black image in front and in back. I then selected the images inside that bracket.
 I
actually did the library shelf twice. The first time, as mentioned,
I had left gaps that were too large, where I simply had not focused
on spots within the scene. The second time I started at the bird
skull (LEFT) and the book shelf blurred out of focus. Although
the image still looked pretty good, I did a final series where
I made sure that the nearest object (the wood of the shelf) was
in focus.
I
actually did the library shelf twice. The first time, as mentioned,
I had left gaps that were too large, where I simply had not focused
on spots within the scene. The second time I started at the bird
skull (LEFT) and the book shelf blurred out of focus. Although
the image still looked pretty good, I did a final series where
I made sure that the nearest object (the wood of the shelf) was
in focus.
Remember, each of the 38 images were shot at f2.8. The changes in color that you see in the 'final' images were produced by tweaking the final copy in Photoshop CS2. I shot the second series at a medium JPEG size, and you may notice some highlighting around the wooden frog and the objects in the very back (left side) that were the result of the smaller JPEG resolution. My first attempts were done on a large JPEG format and the highlighting did not occur.
The next step is the really difficult one. There's a highlighted button that says 'Run' and I clicked that. Within seconds the filter starting churning out the building focus composite, and in about two minutes, max, the filter combined all 38 images. The file for this image is displayed in an Output window, directly below the Source window on the left side of the screen. Going back to File>Save I saved the image.
I shot jpegs for this illustration but the program works with RAW and TIFF files as well. I didn't read the Help menu ... I simply looked at the Focus website and got the gist of what was needed. Making four focus composites (redoing the library shelf three times so that I was providing enough focus detail in each layer), I produced these two composites in less than 10 minutes.
I can't wait to try this out in the field! You can try the program out for yourself with a free download from their website. I think you'll want to buy this one -- I love it!
| DIGITAL | EQUIPMENT | ADVICE | TRAVEL | WILDLIFE | FIELD TIPS |